How To
Setting Up A New iPad: Very Easy Step-By-Step Guide
In this guide you learn how to set up your new iPad and which settings you should use when starting it for the first time.
You might feel confused and overwhelmed with the number of questions the iPad setup asks.
While these questions are simple to tech-savvy users, they can feel unnerving to people who are not.
I erased my iPad and have taken photos of the setup process for your ease of reference.
How This iPad Setup Guide Works
This guide will take you through the steps to set up an iPad in a chronological manner.
While I have taken photos of most of the steps, I have skipped some steps because they are self-explanatory, for example, logging in to your iCloud account.
According to Apple, you will need these to successfully set up a new iPad:
- Internet connection, either through your cellular connection or using WiFi (you will need the name and password of the network);
- Apple ID and password; it’s the same one that’s used on your other Apple devices. You can also set one up during the setup process;
- Credit or debit card to set up Apple Pay;
- Previous iPad or a backup of your iPad;
- Android device if you are transferring content from an Android
Turn On Your iPad
The first step is to locate the power button (on top of the iPad) and press it. You might need to charge the battery if it doesn’t turn on.
If you are blind or have limited vision, you can turn on the screen reader by triple-pressing the Home button (the button at the bottom of the iPad) or the power button (at the top if your iPad does not have a Home button.
You can double-tap the screen with three fingers to turn on the Zoom accessibility feature. The Zoom accessibility feature on the iPad is designed to help those who have difficulty seeing the contents of the screen. It magnifies either a portion of the entire screen up to 15X for easier viewing.
Read: Our Ultimate Apple Pencil Guide

This is the first screen you will see. If your iPad has a home button, press the home button to proceed to the next screen. If you do not have a home button, you can swipe up from the bottom to proceed.

It will ask you to choose the country or region. If the first option isn’t where you are, then scroll down and find the appropriate option.
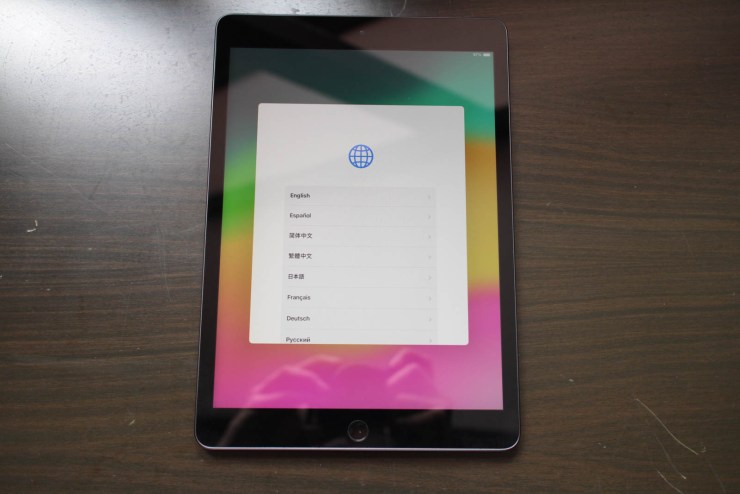
Next, choose the language you want to use with your iPad.

In the Appearance menu, it’ll ask you about how large you want the icons and text to be. Leave it at default if you can make out the text on the screen.
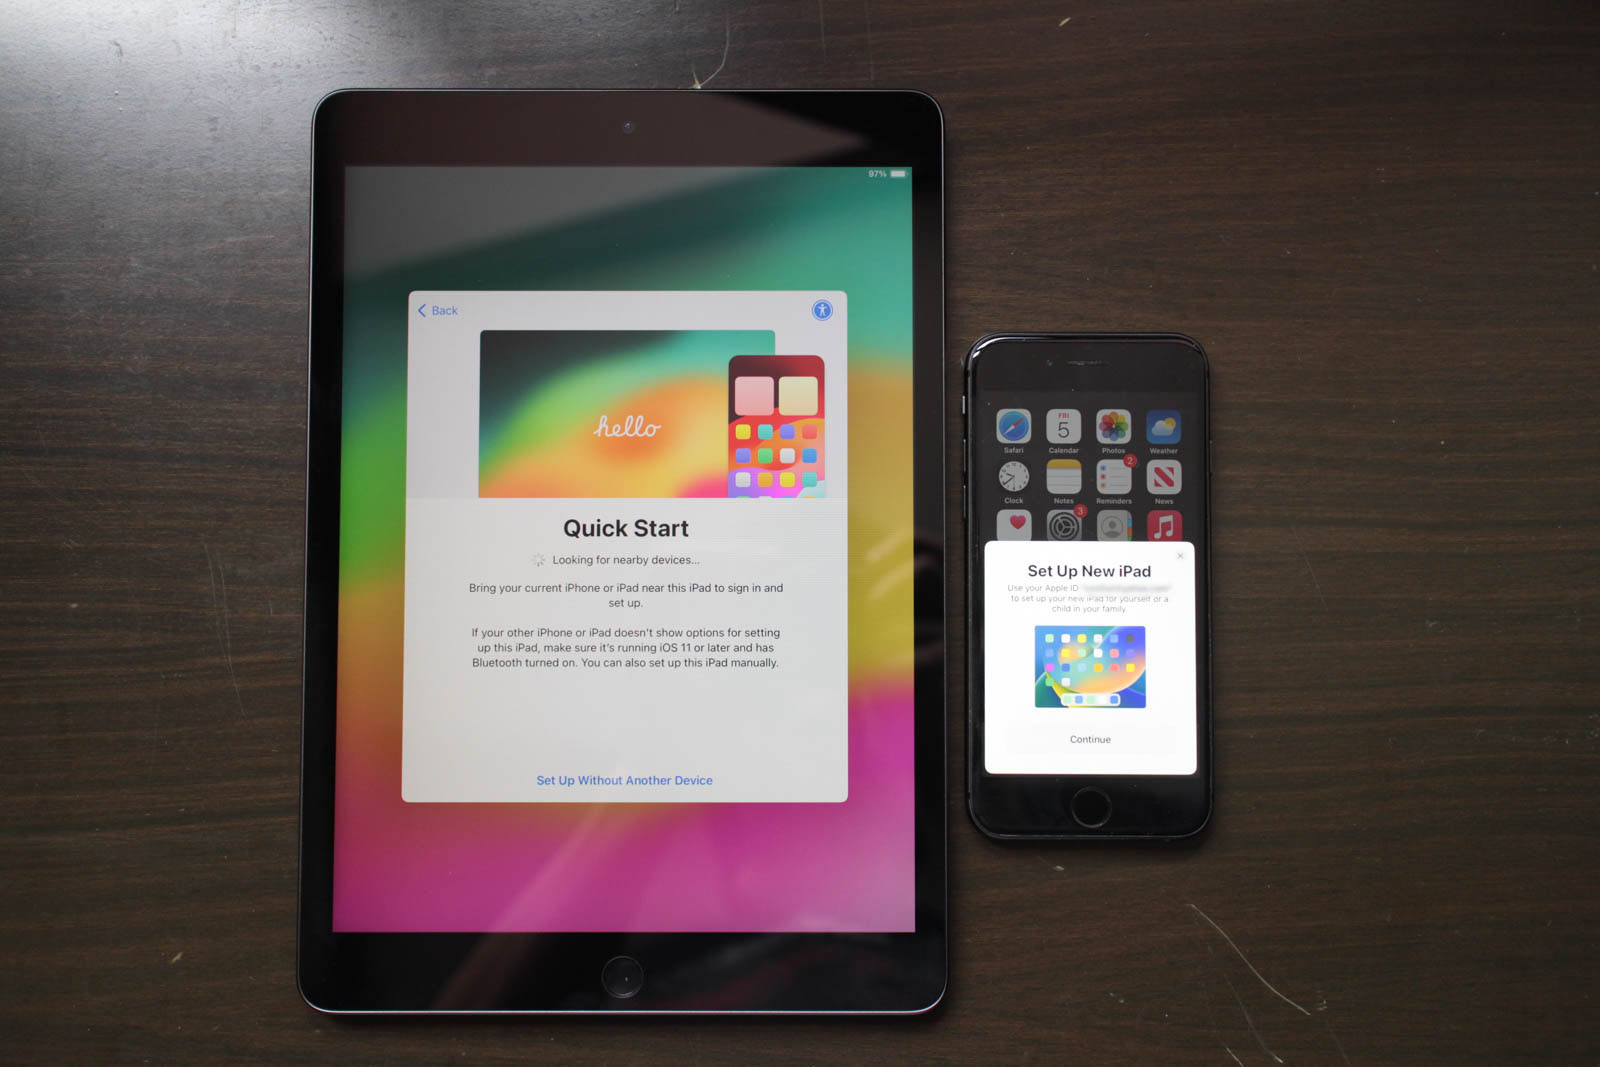
Quick Start If You Have Another Apple Device

In the next screen, it’ll ask you to do Quick Start. If you have a previous iPad or iPhone, you can bring it close to your new iPad. If you don’t, set it up manually by pressing “Set Up without Another Device”.

A pop-up will appear on the other Apple device that says “Set Up New iPad”. Press “Continue”.

You will be asked to scan the moving blue particles on the iPad using your other Apple device.
Choose WiFi Network

In the next screen, choose your WiFi network and type in the password. You will need a WiFi or cellular connection to proceed with the setup.
This step might take a while as the iPad updates itself. Thereafter, you will be displayed a privacy notice. Read it and press Continue.

Face ID or Touch ID

Depending on the model of iPad that you have, you might have the option to log in using your fingerprint (Touch ID) or your facial features (Face ID).
You can also skip this by pressing “Set Up Later”.
Setting Up Face ID
Face ID requires you to move your head around while the iPad is pointed at you. Keep doing it until the completion meter fills up.
Then, you will be asked to do it a second time. The second time is much quicker.
Setting Up Touch ID
Touch ID requires you to place your finger on the home button so that the iPad can register your fingerprint.
Choose wisely which finger to register. I recommend registering the thumb because you are most likely going to use it to unlock your iPad. If you have registered the wrong finger, you can always add more later by going to Settings > Touch ID & Passcode > Add a Fingerprint once you are done with the setup process.
Registering a fingerprint requires you to tap the home button and lift your finger off the home button. The instructions will walk you through the process.

There are two stages to registering a fingerprint. First, register the front of your finger and then register the sides of your finger as part of the second process.
Set Up A Passcode
Finally, you will need to set up a passcode. By default, you will be asked to provide a six-digit code but you can press “Passcode Options” and change it to a four-digit code, a custom numeric code or a custom alphanumeric code.
The longer the passcode, the more secure. Alphanumeric codes are even more secure because they mix alphabets with numbers.
Read: These iPads Are Worth Buying Used & Refurbished
Apps & Data Screen

After setting up your security features, the iPad will ask you how you’d like to transfer your apps and data.
The different steps here are pretty straightforward, so choose the one that suits you best.

- From iCloud Backup: Ideal if you have an existing iCloud backup and want to transfer all your apps, data, and settings to your new iPad.
- From Another iPad: Uses Quick Start to automatically set up your new device with settings, preferences, and iCloud Keychain from another iPhone or iPad with iOS 11 or later. Then restores the rest of your data and content from your iCloud backup.
- From Mac or PC: Ideal if you have a backup on your computer and want to transfer all your apps, data, and settings to your new iPad.
- From Android: Use the Move to iOS app to transfer your data from an Android device when you first set up your new iPad. Ideal if you’re transitioning from an Android device and want to move your contacts, message history, camera photos and videos, web bookmarks, mail accounts, and calendars to your new iPad.
- Don’t Transfer Anything: Set up your new iPad as a brand-new device without transferring any data or settings. Ideal if you want to start fresh without any of the data or settings from your old device. We’ll be going through these steps because it offers the most complete walkthrough of the setup process.
Next Steps
The next screen after pressing “Don’t Transfer Anything” is to enter your Apple ID. If you don’t have one, press “Forgot password or don’t have an Apple ID”, then follow the prompts on the screen.
Here are some crucial moments where you’ll have to make decisions.
Automatic Updates On The iPad

On this screen, you’ll be asked if you want to update your iPad automatically. We’d highly recommend to update your iPad frequently for security reasons. You’ll have two options here — either press Continue and allow the iPad to download and schedule your update, or press “Only Download Automatically” and manually update your iPad.
Your iPad will update at a specific time when you’re not using it, so your use won’t get disrupted by a sudden update. For me, my Apple devices like to schedule updates at 2 AM.
Location Services

Pretty essential, in my opinion, but Location Services has a privacy element to it.
In this screen, you’re giving permission for the iPad to tell a service where you are. This can be useful for the Find My app if you want to find out where your iPad is when it’s lost.
Your location data can also be used for map navigation or for reporting local weather. Otherwise, you will need to manually enter your location every time you use an app.
Decide whether to enable or disable it and move ahead.
Read: The Best iPads With Pen Worth Buying
Apple Pay

Apple Pay is a mobile payment service by Apple that allows users to make payments in person, in iOS apps, and on the web. It uses Near Field Communication (NFC) for contactless payments.
You can register your credit or debit card on Apple Pay and make payments. Unlike Apple Pay on a mobile phone, I don’t see how anyone would take out an iPad to do contactless payments, but having Apple Pay is still convenient for other types of payments.
Screen Time

If you need an app that tells you about your usage patterns, you can set up Screen Time.
Screen Time on the iPad is a feature that provides real-time reports on device usage, including time spent on apps and websites. It also has several safety and health promotion features such as scheduling time away from the screen using the Downtime feature, time limits for apps, screen distance reminders to combat myopia in children.
You can also set communication limits with different groups of people or contacts, and restrict content viewed on the iPad.
At this stage, you will only get the default settings, which will monitor your app usage and provide a report every week.
If you want any of the features mentioned above, you will need to set it up by going to Settings > Screen Time.
iPad Analytics

Do you want to share your usage patterns with Apple? Apple says they will not associate this data with you or your account.
You can press “Share with Apple” or “Don’t Share”.
Light or Dark Mode?

Choosing “Light” means your iPad will display darker text on a bright background, which is ideal for outdoor use or brightly lit rooms for enhanced visibility and readability.
But you might use your iPad in dark environments often, so the strain of a bright background might be too much. Choose the “Dark” mode in this case.
Or you can choose “Auto” which automatically adjusts between the two.
If you find yourself not liking what you have chosen, you can modify the settings by going to Settings > Display & Brightness.
You’re Done!

The initial setup is done when you are shown the main menu with various apps.
By now, your screen is full of fingerprints, so make sure to clean your iPad it the right way.
At this stage, you should know about the Settings menu. It should be an icon on your main menu. If you don’t see it, swipe left or right on your screen to switch between pages to find it.
The Settings menu is important because most of the things that you will configure belong here.
Some things that haven’t seen set up are Siri and wallpaper.
Setting Up a Custom Wallpaper
I found the rainbow-colored default wallpaper to look too garish, so I wanted to change it.
Go to Settings > Wallpaper.
In that menu, you can press “Add New Wallpaper” and choose from the wallpapers provided by Apple or use images in your photo gallery.
Setting Up Siri
If you like giving voice commands to your iPad, you can set up Siri by going to Settings > Siri & Search.
To enable Siri, click Listen For in the Siri & Search menu. Then, you will choose whether you want your iPad to respond to the phrase “Hey Siri” or “Siri” and “Hey Siri”.
You will need to train Siri in order for it to recognize your voice.
Download Apps
You can download your favorite apps on the iPad by going to the App Store. We have a range of recommendations including best browsers, best apps for photographers and best notetaking apps for iPad.
Leave a Reply


The Best Amazon Fire Tablets Compared | 2024 Edition
If you're in the market for the best Fire tablet, we've got your back! Here's a comprehensive comparison of all...


Top 7 Best Tablets Under $500 | 2024 Edition
Looking for the best tablet under $500? We test almost every tablet and here are our test winners in this...


Best Huawei Tablets: Why I Think You Shouldn’t Get One In 2024
Considering the US embargo that led to the lack of Google support, is it a wise decision to purchase a...


11 Best Tablets With 5G, 4G LTE & SIM Card Slot in 2024
Which are the best tablets with 5G, 4G LTE and SIM card slot? I'm reviewing almost every tablet and here...


11 Best Gaming Tablets for Playing Games Reviewed | 2024 Edition
Which are the best gaming tablets for gamers? We test every new device and try out many games. Here are...
-

 The Best6 months ago
9 Best Tablets With Stylus Pen For Drawing & Writing | 2024 Edition
-

 The Best5 months ago
Top 10 Best Tablets with a Keyboard | 2024 Edition
-

 The Best4 months ago
Top 15 Best Android Tablets Based On Real Reviews | 2024 Edition
-
The Best4 months ago
11 Best Tablets With 5G, 4G LTE & SIM Card Slot in 2024
-

 The Best4 months ago
6 Best 8-Inch Mini Tablets Review & Comparison | 2024 Edition
-

 The Best5 months ago
Top 3 Best Windows Tablets You Can Buy Today | 2024 Edition
-

 The Best6 months ago
The 8 Best Samsung Tablets: Our Big 2024 Comparison
-

 The Best6 months ago
Top 7 Best Large Screen Tablets Tested | 2024 Edition
Pingback: iPad einrichten & konfigurieren: Eine einfache Anleitung für Anfänger
Pingback: How to Right-Click on iPad: Accessing More Options • MyNextTablet